

Before you make that satisfying but daunting first stitch, you need to set up your sewing machine. This tutorial is designed to help everyone from complete beginners to people who have lost their way with sewing and are looking to get back into it. Threading your sewing machine is the absolute first step to using it, so it's vital it's done correctly.
Before You Start
Check your sewing machine manual if you have it to hand. It should explain in diagrams how to thread your particular machine. If you have lost your manual, these can be downloaded online. Next, choose the type and colour thread you plan to use and fill the bobbin. Check out our guide to bobbins here if you’re looking for more guidance.
Although we recommend you check the machine manual for detailed instructions on threading your machine, there are some general tips to consider.
- Always raise the pressure foot lifter before you start threading the machine.
- Make sure the power is off on your machine before attempting to thread.
- Use a spool cap to help prevent the thread from getting caught on any irregularities on the thread spool itself. If your machine came with multiple spool cap sizes, use the one that most closely fits the size of the thread spool you’re using.
- Make sure you’re using the correct size and style of needle for the fabric you’re sewing. Using the wrong size or type can cause your thread to shred or break or your fabric to snag.
How To Thread A Sewing Machine
Step One: Machine Set up
Start by ensuring the power is off on your machine. Raise the needle to the highest position by rotating the handwheel towards you and raise the presser foot.
Step Two: Winding A Bobbin
The bobbin is the lower spool of thread for your machine. Typically, a bobbin will already be wound for you, but it will need winding beforehand in some cases.
Place a spool of sewing thread on your machine's thread pin at the top of the machine and wind it anti-clockwise around the pre-tension discs. Thread the thread through the two small holes in the empty bobbin and wind the thread several times around the centre pillar of the bobbin. Place the bobbin on the bobbin winder pin (usually on the top right side, near the thread pin). Press your machine’s foot pedal, and the bobbin should begin winding. Trim the thread to detach it from the larger spool when it's full.
The wound bobbin goes into a little compartment underneath the needle. This is called the bobbin case and is designed to supply the lower thread as your machine sews.
Step Three: Load A Wound Bobbin
To load your bobbin, lift your needle and presser foot to the highest position and remove the cover. Place your bobbin into the round slot, following the arrow inside. Pull the end of the bobbin thread through your machine’s tension spring and replace the bobbin cover.


Step Four: Horizontal or Vertical Threading
Horizontal Threading - If your machine has a horizontal spool pin, place the spool of thread onto the pin and slide the spool pin holder/cap over the spool's rim. This will prevent the thread from tangling or spinning off when you start to sew.
Vertical Threading - Your spool pin will face directly upwards if your machine uses vertical threading. Raise the spool pin and place the thread onto the spool pin.

Step Five: Lead The Thread
Guide the thread along the machine and pass it through the lower slot on the underside of the thread guide. Once safely through, guide the thread through the upper slot. Lead the thread over and around to the right and pull through the guide.
This is located on the left side of the machine.
Step Six: Thread Through The Second Thread Guide
Pass the thread through the second guide by leading the thread to the right and under the guide. It should be inserted from the bottom over the top. Next, holding thread ends in each hand, carefully snap the thread into the upper thread guide. This is usually a hook design, making it easy to spot and hold the thread in place.


Step Seven: Tension
Once through both thread guides and in place, lead the thread down and around the tension mechanism. Hold the spool at the top in place with your right hand and lightly pull the thread with your left hand. This allows the thread to slip into the tension discs without unravelling.


Your machine will have arrows to guide you in the right direction. Follow the arrows and guide the thread down into the threading channel. Make sure the thread is inserted into the tension discs as it passes through.
Step Eight: Wrap The Thread Through The Thread Take-Up Lever.
At the top of the machine’s second groove is a metal hook called the take-up lever. It is slotted for easier threading and keeps the thread in place. Pull down 6 - 8 inches of the thread so that the thread reaches the needle.
Step Nine: Thread The Needle
Pull the thread down towards the sewing machine needle and guide the thread through the guides directly above the needle.
Once safely guided through, thread the eye of the needle from front to back. Keep pulling on the end of the thread until there are several inches of thread through the needle.
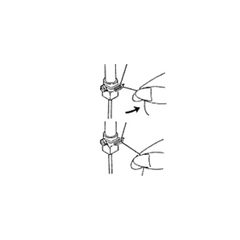
Step Ten: Catch The Thread

Once your top thread and bobbin have been set up, the two threads need to be connected before sewing. Lower the needle using the handwheel all the way down and back up again. By doing this, the needle will catch the bobbin thread and pull it back out in a loop.
Threading the needle of your machine can seem complicated and complex at first. However, if you follow this guide, you’ll quickly get the hang of it and be confident in your skills soon enough. At Singer Outlet, we understand that the world of sewing machines can be an overwhelming one, even before you start on your first project.
As well as this one, we’ve written a guide to sewing machine needles to help you determine which is the best one for you. If you’d like more information or advice on threading your machine or even which machine is right for you, contact our professional team of sewing experts, and we will be happy to help.
